AI芯片基准测试,能指导用户选型,能帮助芯片软硬件改进,是AI产业生态重要的组成部分。但是,这个领域却一直没有公认的成形的规范和标准,为什么?
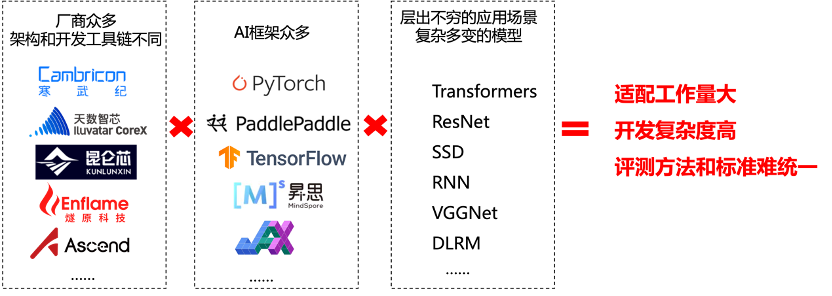
答案很简单,难搞呗~~首先,AI芯片百花齐放,软硬件技术栈各(兼)有(容)千(性)秋(差)。其次,AI框架众多,应用场景层出不穷,模型复杂多变。
由于整个技术栈的复杂度高,制定统一的评测方法和标准本身就非常困难。具体到实现层面,叠加芯片、框架和模型三重考虑,benchmark的开发复杂度高,异构芯片的适配工作量非常大(X款芯片, Y个框架, Z个模型,要做X*Y*Z个case),光适配就要做到地老天荒。看看下面这张图,每个框里的内容还在不停地增长……惊(绝)喜(望)不?

别急,FlagPerf来了~~虽然他很年轻,但他站在巨人们的肩膀上,由智源研究院和多家硬件厂商、框架团队共同开发,立志给大家一个开箱即用的benchmark,无须自行适配,无须完成复杂的环境部署,只要改改配置,一条命令即可启动一组测试。
具体怎么玩呢?四步走:部署安装、配置benchmark、启动测试、结束后查看日志。
1. 部署安装
建议使用Linux Ubuntu 20.04,Python 3.8或以上,并安装Docker的集群(我们的环境用Docker 20.10.9开发测试)。
首先,在测试集群所有服务器上执行以下命令即可完成部署安装:
# git clone https://github.com/FlagOpen/FlagPerf.git
# cd FlagPerf/training/
# pip3 install -r requirements.txt
我们可以看到FlagPerf的目录结构,关注training下面的即可:
└── training
    ├── benchmarks  # benchmark的标准实现
    ├── nvidia      # nvidia配置及扩展,其它芯片也有单独目录
    ├── requirements.txt # FlagPerf依赖的python包
    ├── run_benchmarks # 测试任务的脚本和配置
    └── utils # 测试任务执行需要胡工具
然后,配置测试集群各服务器间root帐号的ssh信任关系,确保可以免密登录。
2. 配置benchmark
1) 修改集群配置文件training/run_benchmarks/config/cluster_conf.py
# cd Flagperf/training/
# vim run_benchmarks/config/cluster_conf.py
集群配置文件主要包括集群服务器列表和SSH端口,按需改成您的服务器IP地址和SSH端口即可,示例如下:
# Hosts to run the benchmark. Each item is an IP address or a hostname.
HOSTS = ["10.1.2.3", "10.1.2.4", "10.1.2.5", "10.1.2.6"]

# ssh connection port
SSH_PORT = "22"
2) 修改测试配置文件training/run_benchmarks/config/test_conf.py
测试配置中主要包括FlagPerf的部署路径、数据和模型checkpoint的路径、要跑的测试benchmark case列表和每个benchmark case的配置信息等。
Tips:
- 请根据自己所在地区,选用合适的pip源来配置PIP_SOURCE
- 每次运行可配置多个benchmark case,每个benchmark case可以通过repeat来配置运行次数
示例如下,如果跑nvidia GPU测试,通常您只需要修改FLAGPERF_PATH_HOST指定FlagPerf在集群服务器上的部署路径,修改CASES指定要跑的benchmark Case列表,并为每个benchmark Case配置相关信息即可。
# Set accelerator's vendor name, e.g. iluvatar, cambricon and kunlun.
# We will run benchmarks in training/<vendor>
VENDOR = "nvidia"
# Accelerator options for docker. TODO FIXME support more accelerators.
ACCE_CONTAINER_OPT = " --gpus all"
# XXX_VISIBLE_DEVICE item name in env
# nvidia use CUDA_VISIBLE_DEVICE and cambricon MLU_VISIBLE_DEVICES
ACCE_VISIBLE_DEVICE_ENV_NAME = "CUDA_VISIBLE_DEVICES"

# Set type of benchmarks, default or customized.
# default: run benchmarks in training/benchmarks/
# [NOT SUPPORTED] customized: run benchmarks in training/<vendor>/benchmarks/
TEST_TYPE = "default"

# Set pip source, which will be used in preparing envs in container
PIP_SOURCE = "https://mirrors.aliyun.com/pypi/simple"

# The path that flagperf deploy in the cluster.
# If not set, it will be os.path.dirname(run.py)/../../training/
FLAGPERF_PATH_HOST = "/home/flagperf/training"

# Set the mapping directory of flagperf in container.
FLAGPERF_PATH_CONTAINER = "/workspace/flagperf/training"

# Set log path on the host here.
FLAGPERF_LOG_PATH_HOST = FLAGPERF_PATH_HOST + "/result/"
# Set log path in container here.
FLAGPERF_LOG_PATH_CONTAINER = FLAGPERF_PATH_CONTAINER + "/result/"
# Set log level. It should be 'debug', 'info', 'warning' or 'error'.
FLAGPERF_LOG_LEVEL = 'debug'

# System config
# Share memory size
SHM_SIZE = "32G"
# Clear cache config. Clean system cache before running testcase.
CLEAR_CACHES = True

# Set cases you want to run here.
# cases is a list of case name.
CASES = ['BERT_PADDLE_DEMO_A100_1X8',
         'GLM_TORCH_DEMO_A100_1X8',
         'CPM_TORCH_DEMO_A100_1X8']

# Config each case in a dictionary like this.
BERT_PADDLE_DEMO_A100_1X8 = { # benchmark case name, one in CASES
    "model": "bert",  # model name
    "framework": "paddle",  # AI framework
    "config": "config_A100x1x8",  # config module in <vendor>/<model>-<framework>/<config>
    "repeat": 1,  # How many times to run this case
    "nnodes": 1,  #  How many hosts to run this case
    "nproc": 8,  # How many processes will run on each host
    "data_dir_host": "/home/datasets_ckpt/bert/train/",  # Data path on host
    "data_dir_container": "/mnt/data/bert/train/",  # Data path in container
}3)修改Vendor目录下的benchmark case配置文件(视自身需求,也可不修改)
benchmark case配置文件在<vendor>/<modle>-<framework>/config目录下,在case配置时指定,例如上面BERT_PADDLE_DEMO_A100_1X8的case里,config配置为confg_A100x1x8,即为nvidia/bert-paddle/config/config_A100x1x8.py,主要包括模型训练的参数,示例如下:
target_mlm_accuracy = 0.67           # Stop training if evaluate mlm_accuracy >= target_mlm_accuracy
gradient_accumulation_steps = 1   # Number of updates steps to accumualte before performing a backward/update pass
max_steps = 10000                          # Steps of training
start_warmup_step = 0
warmup_proportion = 0
warmup_steps = 2000

learning_rate = 1e-4
weight_decay_rate = 0.01
opt_lamb_beta_1 = 0.9
opt_lamb_beta_2 = 0.999
train_batch_size = 12
eval_batch_size = train_batch_size
max_samples_termination = 4500000  # Total number of training samples to run
cache_eval_data = False  # whether to cache evaluation data on GPU

seed = 9031
3. 启动测试
首先,当然要准备数据集和模型checkpoint,我们也为大家选好了标准数据集,准备方法参见training/benchmarks/<model>/<framework>/readme.md。将数据集和模型checkpoint文件放在benchmark case配置里xxx 指定的路径即可。上面的例子里是training/benchmarks/bert/paddle/readme.md。
然后,在修改好配置的服务器上进入training目录 ,用以下一条命令即可启动测试。
# python3 ./run_benchmarks/run.py 为了防止终端断连等异常,推荐采用nohup命令启动:
# python3 ./run_benchmarks/run.py & 启动后可以在终端或者nohup.out中,看到benchmark执行过程,结束后,会提示去哪里查看benchmark case执行日志,示例如下:
2022-11-21 20:36:23,239 [INFO]  [run.py,412]Congrats! See all logs in /home/FlagPerf/training/result/run20221121191924
2022-11-21 20:36:23,239 [INFO]  [run.py,595]Stop FlagperfLogger.
4. 查看日志
从上面可以看出来,日志放在指定的日志路径里run<timestamp>目录下。
日志目录结构按如下方式组织:
├── BERT_PADDLE_DEMO_A100_1X8 # 每个benchmark case一个目录
│   └── round1 # 每轮测试一个子目录
│       └── 10.1.2.2_noderank0 # 每个服务器一个目录 ,<IP>_noderank编号
│           ├── cpu_monitor.log    # CPU利用率
│           ├── mem_monitor.log    # 内存利用率
│           ├── nvidia_monitor.log # GPU显卡使用情况采样
│           ├── pwr_monitor.log    # 带外监控采样
│           ├── rank0.out.log      # rank0进程的日志,每rank一个,下同
│           ├── rank1.out.log
│           ├── rank2.out.log
│           ├── rank3.out.log
│           ├── rank4.out.log
│           ├── rank5.out.log
│           ├── rank6.out.log
│           ├── rank7.out.log
│           └── start_paddle_task.log # 容器内启动训练任务脚本的日志
├── flagperf_run.log # run.py脚本的终端输出在这里也记录了一份
└── start_paddle_task.pid # pid文件,可忽略。
通常,结束测试后,rank0的日志文件里会输出benchmark case运行的情况 ,包括运行时间,运行的step数,最终的Loss值,模型是否收敛到目标精度,模型收敛到的精度等等。示例如下:
[PerfLog] {"event": "STEP_END", "value": {"loss": 2.679504871368408, "embedding_average": 0.916015625, "epoch": 1, "end_training": true, "global_steps": 3397, "num_trained_samples": 869632, "learning_rate": 0.000175375, "seq/s": 822.455385237589}, "metadata": {"file": "/workspace/flagperf/training/benchmarks/cpm/pytorch/run_pretraining.py", "lineno": 127, "time_ms": 1669034171032, "rank": 0}}
[PerfLog] {"event": "EVALUATE", "metadata": {"file": "/workspace/flagperf/training/benchmarks/cpm/pytorch/run_pretraining.py", "lineno": 127, "time_ms": 1669034171032, "rank": 0}}
[PerfLog] {"event": "EPOCH_END", "metadata": {"file": "/workspace/flagperf/training/benchmarks/cpm/pytorch/run_pretraining.py", "lineno": 127, "time_ms": 1669034171159, "rank": 0}}
[PerfLog] {"event": "TRAIN_END", "metadata": {"file": "/workspace/flagperf/training/benchmarks/cpm/pytorch/run_pretraining.py", "lineno": 136, "time_ms": 1669034171159, "rank": 0}}
[PerfLog] {"event": "FINISHED", "value": {"e2e_time": 1661.6114165782928, "training_sequences_per_second": 579.0933420700227, "converged": true, "final_loss": 3.066718101501465, "final_mlm_accuracy": 0.920166015625, "raw_train_time": 1501.713, "init_time": 148.937}, "metadata": {"file": "/workspace/flagperf/training/benchmarks/cpm/pytorch/run_pretraining.py", "lineno": 158, "time_ms": 1669034171646, "rank": 0}} 好啦,这样我们就跑完了一组benchmark基准测试啦~~~很容易吧~~~更多的玩法请参考:https://github.com/FlagOpen/FlagPerf
有小伙伴问,目前没有我想要的benchmark case或者AI框架,怎么办?
两个办法,一是github上提个issue,二是自己动手丰衣足食,在FlagPerf里加个框架加个case也不难。具体怎么加,请听下回分解。
内容中包含的图片若涉及版权问题,请及时与我们联系删除


评论
沙发等你来抢