
新智元报道
新智元报道
【新智元导读】GPT早已成为大模型时代的基础。国外一位开发者发布了一篇实践指南,仅用60行代码构建GPT。
60行代码,从头开始构建GPT?
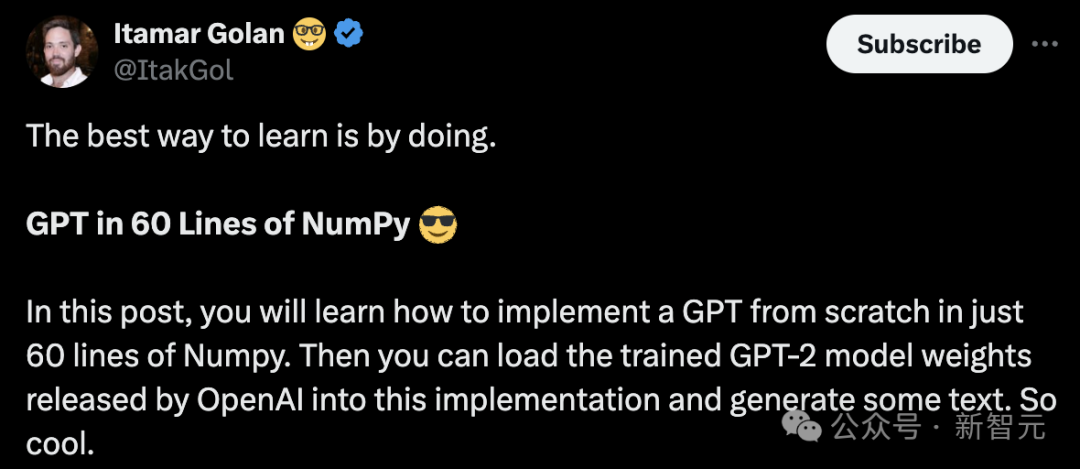
最近,一位开发者做了一个实践指南,用Numpy代码从头开始实现GPT。
你还可以将 OpenAI发布的GPT-2模型权重加载到构建的GPT中,并生成一些文本。
话不多说,直接开始构建GPT。

什么是GPT?
GPT代表生成式预训练Transformer,是一种基于Transformer的神经网络结构。
- Transformer:GPT是一种仅用于解码器的Transformer神经网络。
大模型,如OpenAI的GPT-3、谷歌的LaMDA,以及Cohere的Command XLarge,背后都是GPT。它们的特别之处在于, 1) 非常大(拥有数十亿个参数),2) 受过大量数据(数百GB的文本)的训练。
直白讲,GPT会在提示符下生成文本。
即便使用非常简单的API(输入=文本,输出=文本),一个训练有素的GPT也可以做一些非常棒的事情,比如写邮件,总结一本书,为Instagram发帖提供想法,给5岁的孩子解释黑洞,用SQL编写代码,甚至写遗嘱。
以上就是 GPT 及其功能的高级概述。让我们深入了解更多细节。
输入/输出
GPT定义输入和输出的格式大致如下所示:
def gpt(inputs: list[int]) -> list[list[float]]:# inputs has shape [n_seq]# output has shape [n_seq, n_vocab]output = # beep boop neural network magicreturn output
# integers represent tokens in our text, for example:# text = "not all heroes wear capes":# tokens = "not" "all" "heroes" "wear" "capes"inputs = [1, 0, 2, 4, 6]
Token是文本的子片段,使用分词器生成。我们可以使用词汇表将token映射到整数:
# the index of a token in the vocab represents the integer id for that token# i.e. the integer id for "heroes" would be 2, since vocab[2] = "heroes"vocab = ["all", "not", "heroes", "the", "wear", ".", "capes"]# a pretend tokenizer that tokenizes on whitespacetokenizer = WhitespaceTokenizer(vocab)# the encode() method converts a str -> list[int]ids = tokenizer.encode("not all heroes wear") # ids = [1, 0, 2, 4]# we can see what the actual tokens are via our vocab mappingtokens = [tokenizer.vocab[i] for i in ids] # tokens = ["not", "all", "heroes", "wear"]# the decode() method converts back a list[int] -> strtext = tokenizer.decode(ids) # text = "not all heroes wear"
- 使用词汇表将这些token映射为整数。
在实践中,我们会使用更先进的分词方法,而不是简单地用空白来分割,比如字节对编码(BPE)或WordPiece,但原理是一样的:
decode 方法,可以转换 list[int] -> str ([2])
输出
输出是一个二维数组,其中 output[i][j] 是模型预测的概率,即 vocab[j] 处的token是下一个tokeninputs[i+1] 。例如:
vocab = ["all", "not", "heroes", "the", "wear", ".", "capes"]inputs = [1, 0, 2, 4]output = gpt(inputs)
vocab = ["all", "not", "heroes", "the", "wear", ".", "capes"]inputs = [1, 0, 2, 4] # "not" "all" "heroes" "wear"output = gpt(inputs)next_token_id = np.argmax(output[-1]) # next_token_id = 6next_token = vocab[next_token_id] # next_token = "capes"
预测序列中的下一个逻辑词的任务称为语言建模。因此,我们可以将GPT称为语言模型。
生成一个单词很酷,但整个句子、段落等又如何呢?
生成文本
自回归
我们可以通过迭代从模型中获得下一个token预测来生成完整的句子。在每次迭代中,我们将预测的token追加回输入:
def generate(inputs, n_tokens_to_generate):for _ in range(n_tokens_to_generate): # auto-regressive decode loopoutput = gpt(inputs) # model forward passnext_id = np.argmax(output[-1]) # greedy samplinginputs.append(int(next_id)) # append prediction to inputreturn inputs[len(inputs) - n_tokens_to_generate :] # only return generated idsinput_ids = [1, 0] # "not" "all"output_ids = generate(input_ids, 3) # output_ids = [2, 4, 6]output_tokens = [vocab[i] for i in output_ids] # "heroes" "wear" "capes"
采样
我们可以从概率分布中采样,而不是贪婪采样,从而为生成的引入一些随机性:
inputs = [1, 0, 2, 4] # "not" "all" "heroes" "wear"output = gpt(inputs)np.random.choice(np.arange(vocab_size), p=output[-1]) # capesnp.random.choice(np.arange(vocab_size), p=output[-1]) # hatsnp.random.choice(np.arange(vocab_size), p=output[-1]) # capesnp.random.choice(np.arange(vocab_size), p=output[-1]) # capesnp.random.choice(np.arange(vocab_size), p=output[-1]) # pants
这样,我们就能在输入相同内容的情况下生成不同的句子。
如果与top-k、top-p和温度等在采样前修改分布的技术相结合,我们的输出质量就会大大提高。
这些技术还引入了一些超参数,我们可以利用它们来获得不同的生成行为(例如,提高温度会让我们的模型承担更多风险,从而更具「创造性」)。
训练
我们可以像训练其他神经网络一样,使用梯度下降法训练GPT,并计算损失函数。对于GPT,我们采用语言建模任务的交叉熵损失:
def lm_loss(inputs: list[int], params) -> float:# the labels y are just the input shifted 1 to the left## inputs = [not, all, heros, wear, capes]# x = [not, all, heroes, wear]# y = [all, heroes, wear, capes]## of course, we don't have a label for inputs[-1], so we exclude it from x## as such, for N inputs, we have N - 1 langauge modeling example pairsx, y = inputs[:-1], inputs[1:]# forward pass# all the predicted next token probability distributions at each positionoutput = gpt(x, params)# cross entropy loss# we take the average over all N-1 examplesloss = np.mean(-np.log(output[y]))return lossdef train(texts: list[list[str]], params) -> float:for text in texts:inputs = tokenizer.encode(text)loss = lm_loss(inputs, params)gradients = compute_gradients_via_backpropagation(loss, params)params = gradient_descent_update_step(gradients, params)return params
请注意,我们在gpt函数签名中添加了params (为了简单起见,我们在前面的章节中没有添加)。在训练循环的每一次迭代期间:
- 我们使用梯度来更新我们的模型参数,以使损失最小化(梯度下降)
请注意,我们不使用显式标记的数据。相反,我们能够仅从原始文本本身生成输入/标签对。这被称为自监督学习。
自监督使我们能够大规模扩展训练数据,只需获得尽可能多的原始文本并将其投放到模型中。例如,GPT-3接受了来自互联网和书籍的3000亿个文本token的训练:

当然,你需要一个足够大的模型才能从所有这些数据中学习,这就是为什么GPT-3有1750亿个参数,训练的计算成本可能在100万至1000万美元之间。
这个自监督的训练步骤被称为预训练,因为我们可以重复使用「预训练」的模型权重来进一步训练模型的下游任务。预训练的模型有时也称为「基础模型」。
在下游任务上训练模型称为微调,因为模型权重已经经过了理解语言的预训练,只是针对手头的特定任务进行了微调。
「一般任务的前期训练+特定任务的微调」策略被称为迁移学习。
提示
原则上,最初的GPT论文只是关于预训练Transformer模型用于迁移学习的好处。
论文表明,当对标记数据集进行微调时,预训练的117M GPT在各种自然语言处理任务中获得了最先进的性能。
直到GPT-2和GPT-3论文发表后,我们才意识到,基于足够的数据和参数预训练的GPT模型,本身能够执行任何任务,不需要微调。
只需提示模型,执行自回归语言建模,然后模型就会神奇地给出适当的响应。这就是所谓的「上下文学习」(in-context learning),因为模型只是利用提示的上下文来完成任务。
语境中学习可以是0次、一次或多次。
在给定提示的情况下生成文本也称为条件生成,因为我们的模型是根据某些输入生成一些输出的。
GPT并不局限于NLP任务。
你可以根据你想要的任何条件来微调这个模型。比如,你可以将GPT转换为聊天机器人(如ChatGPT),方法是以对话历史为条件。
说到这里,让我们最后来看看实际的实现。
设置
克隆本教程的存储库:
git clone https://github.com/jaymody/picoGPTcd picoGPT
pip install -r requirements.txt注意:这段代码是用Python 3.9.10测试的。
每个文件的简单分类:
- encoder.py包含OpenAI的BPE分词器的代码,这些代码直接取自gpt-2 repo。
- utils.py包含下载和加载GPT-2模型权重、分词器和超参数的代码。- gpt2.py包含实际的GPT模型和生成代码,我们可以将其作为python脚本运行。- gpt2_pico.py与gpt2.py相同,但代码行数更少。
我们将从头开始重新实现gpt2.py ,所以让我们删除它并将其重新创建为一个空文件:
rm gpt2.pytouch gpt2.py
import numpy as npdef gpt2(inputs, wte, wpe, blocks, ln_f, n_head):pass # TODO: implement thisdef generate(inputs, params, n_head, n_tokens_to_generate):from tqdm import tqdmfor _ in tqdm(range(n_tokens_to_generate), "generating"): # auto-regressive decode looplogits = gpt2(inputs, **params, n_head=n_head) # model forward passnext_id = np.argmax(logits[-1]) # greedy samplinginputs.append(int(next_id)) # append prediction to inputreturn inputs[len(inputs) - n_tokens_to_generate :] # only return generated idsdef main(prompt: str, n_tokens_to_generate: int = 40, model_size: str = "124M", models_dir: str = "models"):from utils import load_encoder_hparams_and_params# load encoder, hparams, and params from the released open-ai gpt-2 filesencoder, hparams, params = load_encoder_hparams_and_params(model_size, models_dir)# encode the input string using the BPE tokenizerinput_ids = encoder.encode(prompt)# make sure we are not surpassing the max sequence length of our modelassert len(input_ids) + n_tokens_to_generate < hparams["n_ctx"]# generate output idsoutput_ids = generate(input_ids, params, hparams["n_head"], n_tokens_to_generate)# decode the ids back into a stringoutput_text = encoder.decode(output_ids)return output_textif __name__ == "__main__":import firefire.Fire(main)
- gpt2函数是我们将要实现的实际GPT代码。你会注意到,除了inputs之外,函数签名还包括一些额外的内容:
n_head是前向传递过程中需要的超参数。
加载分词器(encoder)、模型权重(params)和超参数(hparams)
使用分词器将输入提示编码为token ID
调用生成函数
from utils import load_encoder_hparams_and_paramsencoder, hparams, params = load_encoder_hparams_and_params("124M", "models")
这将把必要的模型和分词器文件下载到models/124M ,并将encoder、 hparams和params加载到我们的代码中。
ids = encoder.encode("Not all heroes wear capes.")ids[3673, 477, 10281, 5806, 1451, 274, 13]encoder.decode(ids)"Not all heroes wear capes."
使用分词器的词汇表(存储在encoder.decoder中),我们可以看到实际的token是什么样子的:
[encoder.decoder[i] for i in ids]['Not', 'Ġall', 'Ġheroes', 'Ġwear', 'Ġcap', 'es', '.']
请注意,我们的token有时是单词(例如Not),有时是单词但前面有空格(例如Ġall,Ġ表示空格),有时是单词的一部分(例如Capes分为Ġcap和es),有时是标点符号(例如.)。
[encoder.decoder[i] for i in encoder.encode("zjqfl")]['z', 'j', 'q', 'fl']
我们还可以检查词汇表的大小:
len(encoder.decoder)50257
词汇表以及确定如何拆分字符串的字节对合并是通过训练分词器获得的。
> hparams{"n_vocab": 50257, # number of tokens in our vocabulary"n_ctx": 1024, # maximum possible sequence length of the input"n_embd": 768, # embedding dimension (determines the "width" of the network)"n_head": 12, # number of attention heads (n_embd must be divisible by n_head)"n_layer": 12 # number of layers (determines the "depth" of the network)}
我们将在代码的注释中使用这些符号来显示事物的基本形状。我们还将使用n_seq表示输入序列的长度(即n_seq = len(inputs))。
import numpy as npdef shape_tree(d):if isinstance(d, np.ndarray):return list(d.shape)elif isinstance(d, list):return [shape_tree(v) for v in d]elif isinstance(d, dict):return {k: shape_tree(v) for k, v in d.items()}else:ValueError("uh oh")>>>print(shape_tree(params)){"wpe": [1024, 768],"wte": [50257, 768],"ln_f": {"b": [768], "g": [768]},"blocks": [{"attn": {"c_attn": {"b": [2304], "w": [768, 2304]},"c_proj": {"b": [768], "w": [768, 768]},},"ln_1": {"b": [768], "g": [768]},"ln_2": {"b": [768], "g": [768]},"mlp": {"c_fc": {"b": [3072], "w": [768, 3072]},"c_proj": {"b": [768], "w": [3072, 768]},},},... # repeat for n_layers]}
这些是从原始OpenAI TensorFlow检查点加载的:
import tensorflow as tftf_ckpt_path = tf.train.latest_checkpoint("models/124M")for name, _ in tf.train.list_variables(tf_ckpt_path):arr = tf.train.load_variable(tf_ckpt_path, name).squeeze()print(f"{name}: {arr.shape}")model/h0/attn/c_attn/b: (2304,)model/h0/attn/c_attn/w: (768, 2304)model/h0/attn/c_proj/b: (768,)model/h0/attn/c_proj/w: (768, 768)model/h0/ln_1/b: (768,)model/h0/ln_1/g: (768,)model/h0/ln_2/b: (768,)model/h0/ln_2/g: (768,)model/h0/mlp/c_fc/b: (3072,)model/h0/mlp/c_fc/w: (768, 3072)model/h0/mlp/c_proj/b: (768,)model/h0/mlp/c_proj/w: (3072, 768)model/h1/attn/c_attn/b: (2304,)model/h1/attn/c_attn/w: (768, 2304)...model/h9/mlp/c_proj/b: (768,)model/h9/mlp/c_proj/w: (3072, 768)model/ln_f/b: (768,)model/ln_f/g: (768,)model/wpe: (1024, 768)model/wte: (50257, 768)
下面的代码将上述TensorFlow变量转换为我们的params词典。
>>> import tensorflow as tf>>> tf_ckpt_path = tf.train.latest_checkpoint("models/124M")>>> for name, _ in tf.train.list_variables(tf_ckpt_path):>>> arr = tf.train.load_variable(tf_ckpt_path, name).squeeze()>>> print(f"{name}: {arr.shape}")model/h0/attn/c_attn/b: (2304,)model/h0/attn/c_attn/w: (768, 2304)model/h0/attn/c_proj/b: (768,)model/h0/attn/c_proj/w: (768, 768)model/h0/ln_1/b: (768,)model/h0/ln_1/g: (768,)model/h0/ln_2/b: (768,)model/h0/ln_2/g: (768,)model/h0/mlp/c_fc/b: (3072,)model/h0/mlp/c_fc/w: (768, 3072)model/h0/mlp/c_proj/b: (768,)model/h0/mlp/c_proj/w: (3072, 768)model/h1/attn/c_attn/b: (2304,)model/h1/attn/c_attn/w: (768, 2304)...model/h9/mlp/c_proj/b: (768,)model/h9/mlp/c_proj/w: (3072, 768)model/ln_f/b: (768,)model/ln_f/g: (768,)model/wpe: (1024, 768)model/wte: (50257, 768)
基本层
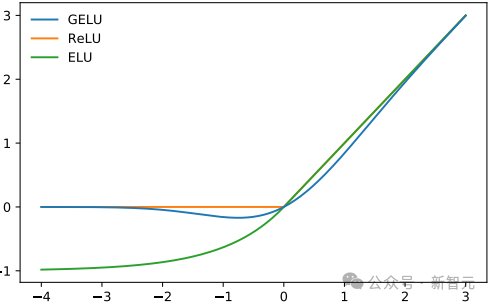
def gelu(x):return 0.5 * x * (1 + np.tanh(np.sqrt(2 / np.pi) * (x + 0.044715 * x**3)))
gelu(np.array([[1, 2], [-2, 0.5]]))array([[ 0.84119, 1.9546 ],[-0.0454 , 0.34571]])
Softmax

def softmax(x):exp_x = np.exp(x - np.max(x, axis=-1, keepdims=True))return exp_x / np.sum(exp_x, axis=-1, keepdims=True)
我们使用max(x)技巧来保证数值稳定性。
x = softmax(np.array([[2, 100], [-5, 0]]))xarray([[0.00034, 0.99966],[0.26894, 0.73106]])x.sum(axis=-1)array([1., 1.])
层归一化

def layer_norm(x, g, b, eps: float = 1e-5):mean = np.mean(x, axis=-1, keepdims=True)variance = np.var(x, axis=-1, keepdims=True)x = (x - mean) / np.sqrt(variance + eps) # normalize x to have mean=0 and var=1 over last axisreturn g * x + b # scale and offset with gamma/beta params
层归一化确保每一层的输入始终在一致的范围内,这会加快和稳定训练过程。
>>> x = np.array([[2, 2, 3], [-5, 0, 1]])>>> x = layer_norm(x, g=np.ones(x.shape[-1]), b=np.zeros(x.shape[-1]))>>> xarray([[-0.70709, -0.70709, 1.41418],[-1.397 , 0.508 , 0.889 ]])>>> x.var(axis=-1)array([0.99996, 1. ]) # floating point shenanigans>>> x.mean(axis=-1)array([-0., -0.])Linear
你的标准矩阵乘法+偏差:
def linear(x, w, b): # [m, in], [in, out], [out] -> [m, out]return x @ w + b线性层通常称为映射(因为它们从一个向量空间映射到另一个向量空间)。
>>> x = np.random.normal(size=(64, 784)) # input dim = 784, batch/sequence dim = 64>>> w = np.random.normal(size=(784, 10)) # output dim = 10>>> b = np.random.normal(size=(10,))>>> x.shape # shape before linear projection(64, 784)>>> linear(x, w, b).shape # shape after linear projection(64, 10)
GPT架构
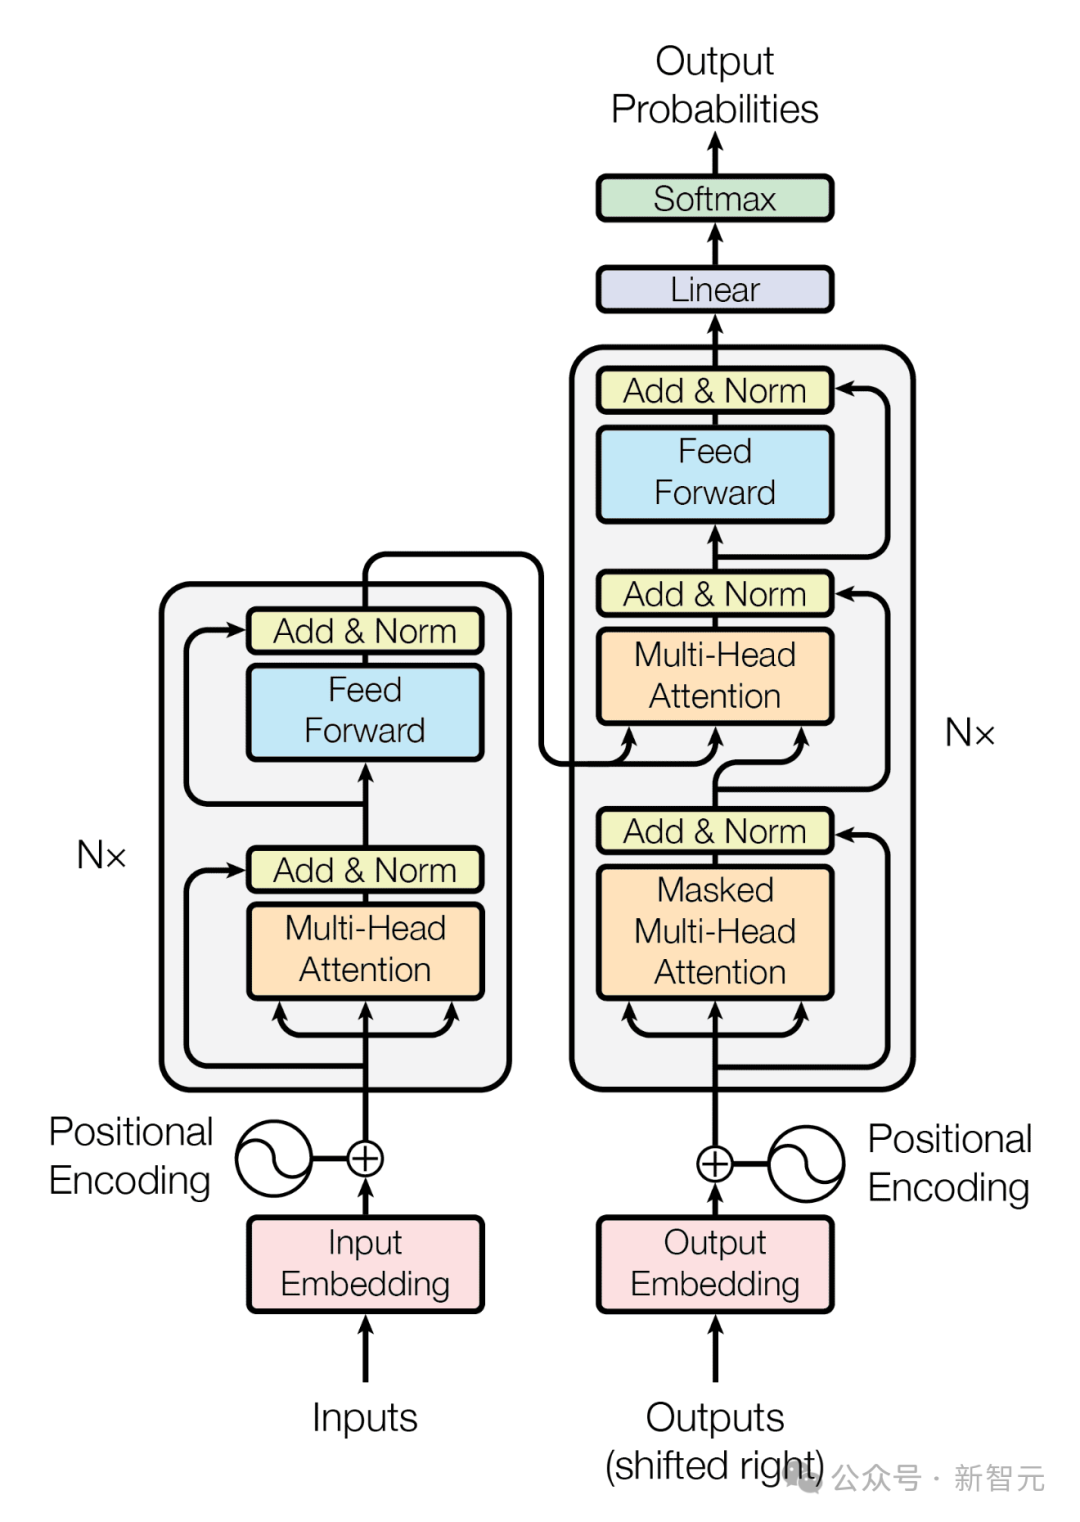
GPT架构遵循Transformer的架构: 从高层次上讲,GPT体系结构有三个部分: 文本+位置嵌入
一种transformer解码器堆栈
向单词步骤的映射 在代码中,它如下所示: def gpt2(inputs, wte, wpe, blocks, ln_f, n_head): # [n_seq] -> [n_seq, n_vocab]# token + positional embeddingsx = wte[inputs] + wpe[range(len(inputs))] # [n_seq] -> [n_seq, n_embd]# forward pass through n_layer transformer blocksfor block in blocks:x = transformer_block(x, **block, n_head=n_head) # [n_seq, n_embd] -> [n_seq, n_embd]# projection to vocabx = layer_norm(x, **ln_f) # [n_seq, n_embd] -> [n_seq, n_embd]return x @ wte.T # [n_seq, n_embd] -> [n_seq, n_vocab]
把所有放在一起
把所有这些放在一起,我们得到了gpt2.py,它总共只有120行代码(如果删除注释和空格,则为60行)。 我们可以通过以下方式测试我们的实施: python gpt2.py \"Alan Turing theorized that computers would one day become" \--n_tokens_to_generate 8它给出了输出:
the most powerful machines on the planet.它成功了!
我们可以使用下面的Dockerfile测试我们的实现与OpenAI官方GPT-2 repo的结果是否一致。 docker build -t "openai-gpt-2" "https://gist.githubusercontent.com/jaymody/9054ca64eeea7fad1b58a185696bb518/raw/Dockerfile"docker run -dt "openai-gpt-2" --name "openai-gpt-2-app"docker exec -it "openai-gpt-2-app" /bin/bash -c 'python3 src/interactive_conditional_samples.py --length 8 --model_type 124M --top_k 1'# paste "Alan Turing theorized that computers would one day become" when prompted这应该会产生相同的结果:
the most powerful machines on the planet.
下一步呢?
这个实现很酷,但它缺少很多花哨的东西: GPU/TPU支持
将NumPy替换为JAX: import jax.numpy as np你现在可以使用代码与GPU,甚至TPU!只需确保正确安装了JAX即可。
反向传播 同样,如果我们用JAX替换NumPy: import jax.numpy as np然后,计算梯度就像以下操作一样简单:
def lm_loss(params, inputs, n_head) -> float:x, y = inputs[:-1], inputs[1:]output = gpt2(x, **params, n_head=n_head)loss = np.mean(-np.log(output[y]))return lossgrads = jax.grad(lm_loss)(params, inputs, n_head)Batching再一次,如果我们用JAX替换NumPy:
import jax.numpy as np然后,对gpt2函数进行批处理非常简单:
gpt2_batched = jax.vmap(gpt2, in_axes=[0, None, None, None, None, None])gpt2_batched(batched_inputs) # [batch, seq_len] -> [batch, seq_len, vocab]推理优化
我们的实现效率相当低。你可以进行的最快、最有效的优化(在GPU+批处理支持之外)将是实现KV缓存。 训练 训练GPT对于神经网络来说是相当标准的(梯度下降是损失函数)。 当然,在训练GPT时,你还需要使用标准的技巧包(例如,使用ADAM优化器、找到最佳学习率、通过辍学和/或权重衰减进行正则化、使用学习率调度器、使用正确的权重初始化、批处理等)。 训练一个好的GPT模型的真正秘诀是调整数据和模型的能力,这才是真正的挑战所在。 对于缩放数据,你需要一个大、高质量和多样化的文本语料库。 - 大意味着数十亿个token(TB级的数据)。 - 高质量意味着您想要过滤掉重复的示例、未格式化的文本、不连贯的文本、垃圾文本等。 - 多样性意味着不同的序列长度,关于许多不同的主题,来自不同的来源,具有不同的视角等等。 评估
如何评价一个LLM,这是一个很难的问题。 停止生成 当前的实现要求我们提前指定要生成的token的确切数量。这并不是一个好方法,因为我们生成的token最终会过长、过短或在句子中途中断。 为了解决这个问题,我们可以引入一个特殊的句尾(EOS)标记。 在预训练期间,我们将EOS token附加到输入的末尾(即tokens = ["not", "all", "heroes", "wear", "capes", ".", "<|EOS|>"])。 在生成期间,只要我们遇到EOS token(或者如果我们达到了某个最大序列长度),就会停止: def generate(inputs, eos_id, max_seq_len):prompt_len = len(inputs)while inputs[-1] != eos_id and len(inputs) < max_seq_len:output = gpt(inputs)next_id = np.argmax(output[-1])inputs.append(int(next_id))return inputs[prompt_len:]GPT-2没有预训练EOS token,所以我们不能在我们的代码中使用这种方法。
无条件生成 使用我们的模型生成文本需要我们使用提示符对其进行条件调整。 但是,我们也可以让我们的模型执行无条件生成,即模型在没有任何输入提示的情况下生成文本。 这是通过在预训练期间将特殊的句子开始(BOS)标记附加到输入开始(即tokens = ["<|BOS|>", "not", "all", "heroes", "wear", "capes", "."])来实现的。 然后,要无条件地生成文本,我们输入一个只包含BOS token的列表: def generate_unconditioned(bos_id, n_tokens_to_generate):inputs = [bos_id]for _ in range(n_tokens_to_generate):output = gpt(inputs)next_id = np.argmax(output[-1])inputs.append(int(next_id))return inputs[1:]GPT-2预训练了一个BOS token(名称为<|endoftext|>),因此使用我们的实现无条件生成非常简单,只需将以下行更改为:
input_ids = encoder.encode(prompt) if prompt else [encoder.encoder["<|endoftext|>"]]然后运行:
python gpt2.py ""这将生成:
The first time I saw the new version of the game, I was so excited. I was so excited to see the new version of the game, I was so excited to see the new version因为我们使用的是贪婪采样,所以输出不是很好(重复),而且是确定性的(即,每次我们运行代码时都是相同的输出)。为了得到质量更高且不确定的生成,我们需要直接从分布中抽样(理想情况下,在应用类似top-p的方法之后)。
无条件生成并不是特别有用,但它是展示GPT能力的一种有趣的方式。 微调
我们在训练部分简要介绍了微调。回想一下,微调是指当我们重新使用预训练的权重来训练模型执行一些下游任务时。我们称这一过程为迁移学习。 从理论上讲,我们可以使用零样本或少样本提示,来让模型完成我们的任务, 然而,如果你可以访问token的数据集,微调GPT将产生更好的结果(在给定更多数据和更高质量的数据的情况下,结果可以扩展)。 有几个与微调相关的不同主题,我将它们细分如下: 分类微调 在分类微调中,我们给模型一些文本,并要求它预测它属于哪一类。 例如,以IMDB数据集为例,它包含将电影评为好或差的电影评论: --- Example 1 ---Text: I wouldn't rent this one even on dollar rental night.Label: Bad--- Example 2 ---Text: I don't know why I like this movie so well, but I never get tired of watching it.Label: Good--- Example 3 ---...为了微调我们的模型,我们将语言建模头替换为分类头,并将其应用于最后一个token输出:
def gpt2(inputs, wte, wpe, blocks, ln_f, cls_head, n_head):x = wte[inputs] + wpe[range(len(inputs))]for block in blocks:x = transformer_block(x, **block, n_head=n_head)x = layer_norm(x, **ln_f)# project to n_classes# [n_embd] @ [n_embd, n_classes] -> [n_classes]return x[-1] @ cls_head我们只使用最后一个token输出x[-1],因为我们只需要为整个输入生成单一的概率分布,而不是语言建模中的n_seq分布。
尤其,我们采用最后一个token,因为最后一个token是唯一被允许关注整个序列的token,因此具有关于整个输入文本的信息。 像往常一样,我们优化了w.r.t.交叉熵损失: def singe_example_loss_fn(inputs: list[int], label: int, params) -> float:logits = gpt(inputs, **params)probs = softmax(logits)loss = -np.log(probs[label])return loss我们还可以通过应用sigmoid而不是softmax来执行多标签分类,并获取关于每个类别的二进制交叉熵损失。
生成式微调 有些任务不能被整齐地归类。例如,总结这项任务。 我们只需对输入和标签进行语言建模,就能对这类任务进行微调。例如,下面是一个总结训练样本: --- Article ---This is an article I would like to summarize.--- Summary ---This is the summary.我们像在预训练中一样训练模型(优化w.r.t语言建模损失)。
在预测时间,我们向模型提供直到--- Summary ---的所有内容,然后执行自回归语言建模以生成摘要。 分隔符--- Article ---和--- Summary ---的选择是任意的。如何选择文本的格式由你自己决定,只要它在训练和推理之间保持一致。 注意,我们还可以将分类任务制定为生成式任务(例如使用IMDB): --- Text ---I wouldn't rent this one even on dollar rental night.--- Label ---Bad指令微调
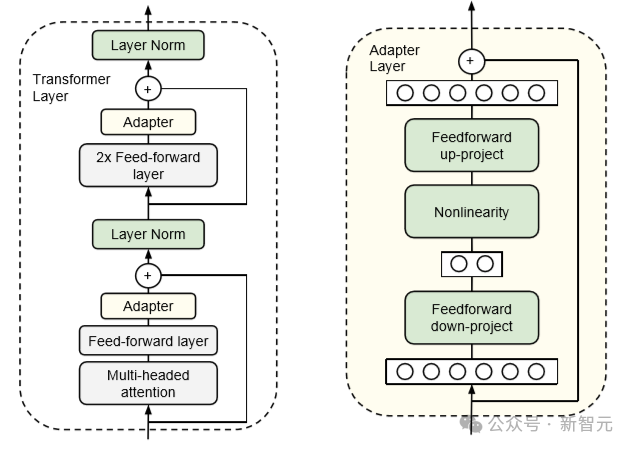
如今,大多数最先进的大模型在经过预寻来你后,还会经历额外的指令微调。 在这一步中,模型对数千个人类标记的指令提示+完成对进行了微调(生成)。指令微调也可以称为有监督的微调,因为数据是人为标记的。 那么,指令微调有什么好处呢? 虽然预测维基百科文章中的下一个单词能让模型擅长续写句子,但这并不能让它特别擅长遵循指令、进行对话或总结文档(我们希望GPT能做的所有事情)。 在人类标注的指令+完成对上对其进行微调,是一种教模型如何变得更有用,并使其更易于交互的方法。 这就是所谓的AI对齐,因为我们正在对模型进行对齐,使其按照我们的意愿行事。 参数高效微调 当我们在上述章节中谈到微调时,假定我们正在更新所有模型参数。 虽然这能产生最佳性能,但在计算(需要对整个模型进行反向传播)和存储(每个微调模型都需要存储一份全新的参数副本)方面成本高昂。 解决这个问题最简单的方法就是只更新头部,冻结(即无法训练)模型的其他部分。 虽然这可以加快训练速度,并大大减少新参数的数量,但效果并不是特别好,因为我们失去了深度学习的深度。 相反,我们可以选择性地冻结特定层,这将有助于恢复深度。这样做的结果是,效果会好很多,但我们的参数效率会降低很多,也会失去一些训练速度的提升。 值得一提的是,我们还可以利用参数高效的微调方法。 以Adapters 一文为例。在这种方法中,我们在transformer块中的FFN和MHA层之后添加一个额外的「适配器」层。 适配层只是一个简单的两层全连接神经网络,输入输出维度为 n_embd ,隐含维度小于 n_embd : 隐藏维度的大小是一个超参数,我们可以对其进行设置,从而在参数与性能之间进行权衡。 论文显示,对于BERT模型,使用这种方法可以将训练参数的数量减少到2%,而与完全微调相比,性能只受到很小的影响(<1%)。 参考资料: https://twitter.com/ItakGol/status/1761852345502081327?t=MNOiF-cOqXG7jUesISmuXg&s=19
内容中包含的图片若涉及版权问题,请及时与我们联系删除




评论
沙发等你来抢